
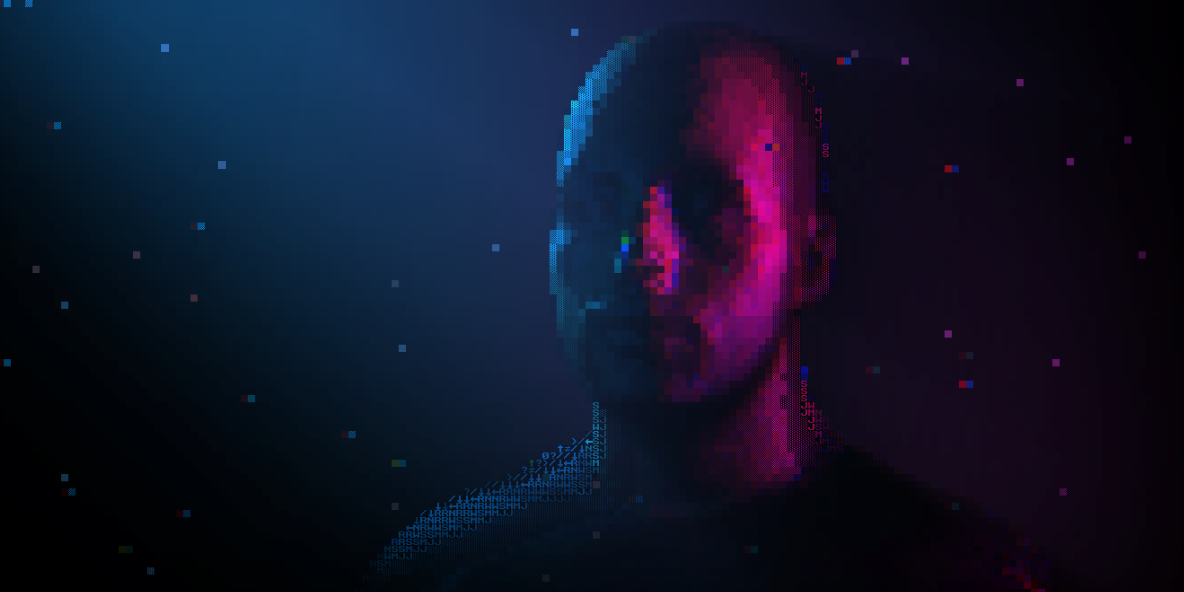
Creating My Website's 3D Header 1.0
A complete walk-through of how I created the 3D header for my website. From 3D scanning with an iPhone to the WebGL render process.
Introduction
I've recently spent a lot of time on the new design for my website. I wanted to create something iconic that represented my image, interests, and skills.
I wanted something memorable.
Being a personal website, what would be more personal than my face. And that's how I started to work on the completely overkill, yet awesome 3D header for my website.
I'm going to break the process down into 3 main sections:
- 📷 Capturing - Taking the 3D scan
- ⚙️ Processing - Converting this capture into a usable 3D model
- 🖼️ Rendering - Rendering the 3D model using Three.js
Capturing
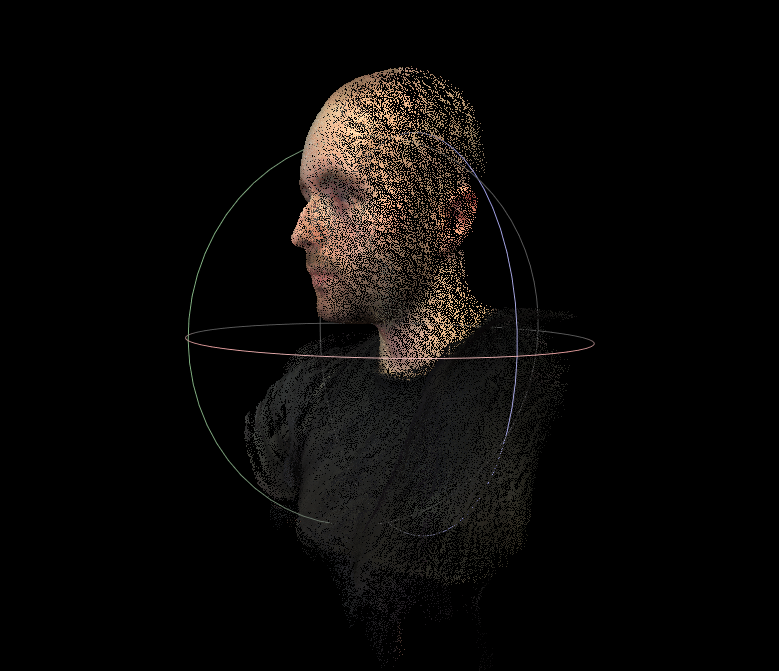
Taking the 3D scan was surprisingly easy.
I used an iOS app called Capture by Standard Cyborg. After signing up for an account, all 3D captures taken on my iPhone became accessible as a .ply download from their web app.
This app uses Apple's TrueDepth camera, the same hardware used for Face ID. So, this is only available on the iPhone X, Xs, Xr, and Xs Max.
The trick is to stay as still as possible and move the camera around your face to capture every angle. This is much easier if you get someone else to do the capturing for you!
This app will capture a point cloud, which is a set of data points in 3D space. It also captures a color for each point.
Once I have a scan that I'm happy with, I download it as a .ply file from the Standard Cyborg web app.
Processing
It's time to turn this point cloud into a 3D model that we can efficiently render. For this I use a program called MeshLab.
First Import the .ply file using File > Import Mesh... or CTRL + I
We want to use this point data to recontruct the surfaces. We can use a built-in algorithm to do this: Filters > Remeshing, Simplification and Reconstruction > Screened Poisson Surface Reconstruction.
The default settings for this usually work very well. But, I do recommend enabling Pre-Clean just to be safe. If you're interested in what these values do, you can click the Help button for detailed descriptions!
Hit the Apply button to run the algorithm, and it will create a new mesh layer called Poisson mesh with reconstructed surfaces:

Great! now we have a mesh with edges and faces.
Select the Poisson mesh layer by and export it using File > Export Mesh... or CTRL + E.
I then take this new mesh into Blender to clean it up by hand:
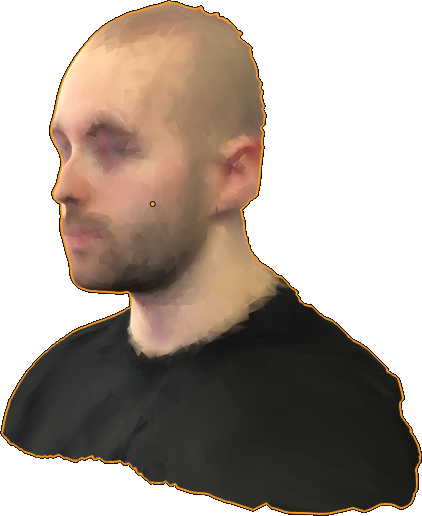
Because I'll be applying an ASCII shader, I don't need much detail. So, I lower the vertex/face count by applying a Decimate Modifier. This reduces file size by removing unnecessary detail. It also increases performance because the mesh is less complex.
Once I'm happy with the mesh, it's time to export it to a .glb file. This is the binary form of glTF (GL Transmission Format). This format is perfect for the web because of it's efficient delivery and loading times.
I also recommend optimizing the file using gltfpack. Using the simple example on the .glb without extra flags reduced the filesize by 66%.
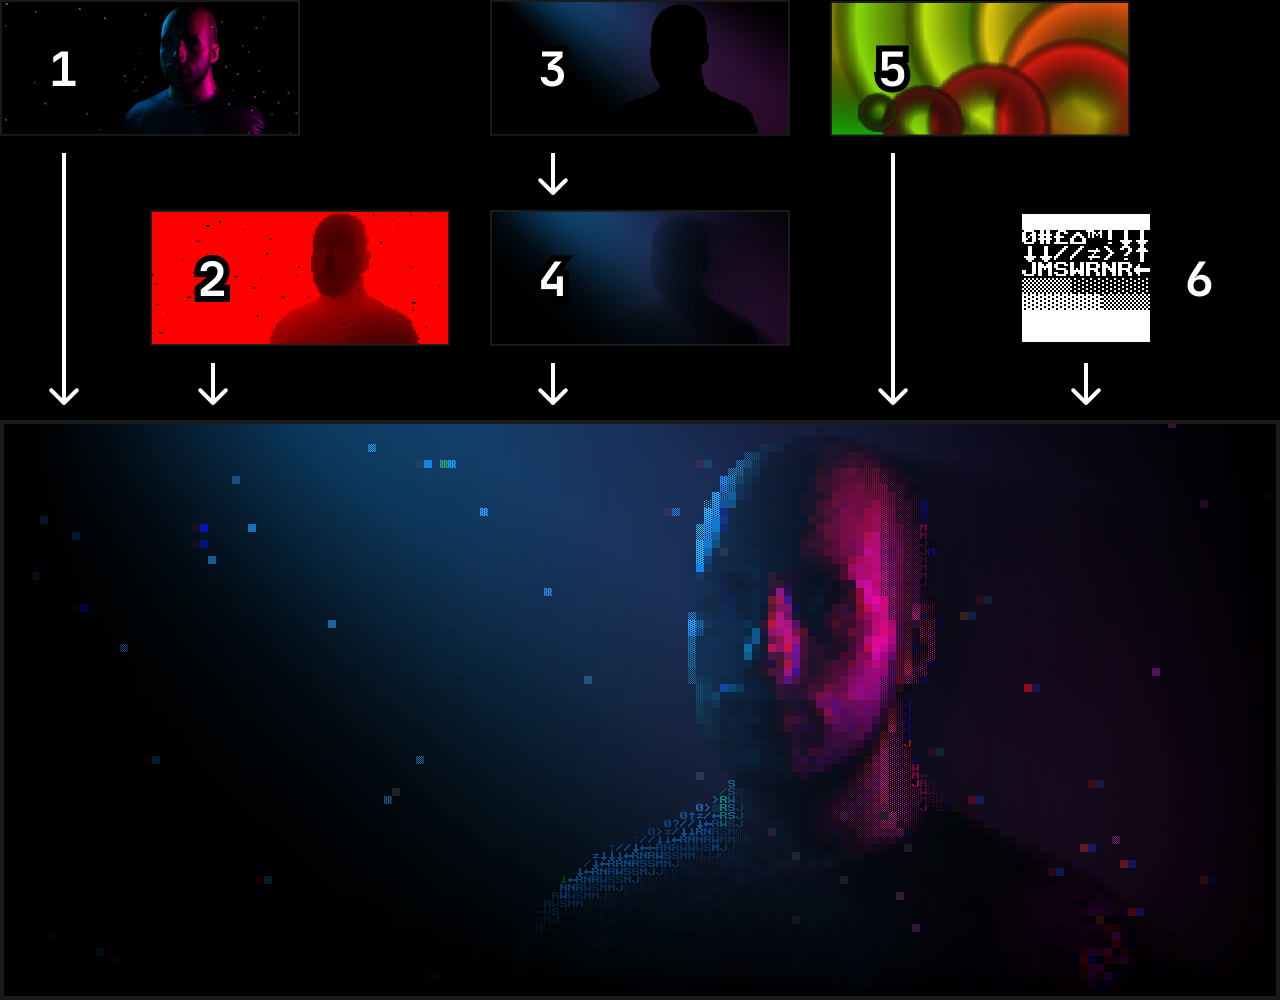
Rendering
I made the 3D header using Three.js and it's WebGL renderer.
I'm going to break down the rendering process to:
- ⚙️ Creating the 3D Scene
- 👤 Loading the 3D Model
- 💡 Volumetric Lighting
- ✨ Vertex Lit Particles
- 🔣 ASCII Effect
- ✴️ Scan Effect
- 💧 Ripple Effect
- 🖼️ Final Result
I use 2 layers for rendering:
- 🔴 Main Layer - for main render
- 🔵 Occlusion Layer - for volumetric lighting
There's 1 main scene which contains:
- 👤 3D Head With Vertex Colors 🔴
- 👤 3D Head With Black Color Material 🔵
- ✨ Particle System 🔴
- 📣 Cylinder Mesh for Volumetric Spotlight 🔵
- 🔦 Point Lights 🔴🔵
- 📷 Perspective Camera 🔴🔵
Every frame it will:
- Render ripple effect using gradient circles on a canvas
- Render occlusion layer & apply volumetric light scattering pass
- Render main layer & depth texture
- Render quad to screen with main shader
So, there are 6 textures:
- Main Color
- Main Depth
- Occlusion - Before Volumetric Light Scattering Pass
- Occlusion - After Volumetric Light Scattering Pass
- Ripple Effect
- Bitmap Font
The main shader uses all these textures to produce the final render:
Creating the 3D Scene
Let's get started with a simple scene.
If you're new to Three.js, they have a great guide with a complete explanation of creating a scene.
Open a sandbox for any example to play with the code!
You can also find the code on GitHub.
Let's take a quick look at what's going on here...
const mainScene = new THREE.Scene()

const mainCamera = new THREE.PerspectiveCamera(
  20,
  window.innerWidth / window.innerHeight,
  0.1,
  20
)
mainCamera.position.z = 10
First, we need a main scene and camera.
This sets up the camera is with:
20Vertical field of view- Aspect ratio of the browser viewport
0.1Clipping near plane20Clipping far plane10Z axis position
const backLight = new THREE.PointLight(0x00aaff, 3, 20)
backLight.position.set(-5, 5, -5)
mainScene.add(backLight)

const fillLight = new THREE.PointLight(0x00aaff, 0.7, 20)
fillLight.position.set(-5, 0, 5)
mainScene.add(fillLight)

const keyLight = new THREE.PointLight(0xff00ff, 2, 20)
keyLight.position.set(5, 0, 0)
mainScene.add(keyLight)
Next, we add some cyberpunk-inspired blue and pink lighting!
Using 3 point lights:
backLight- A bright blue light - [ Left, Top, Back ]fillLight- A soft blue light - [ Left, Center, Front ]keyLight- A pink light - [ Right, Center, Inline ]
const renderer = new THREE.WebGLRenderer()
renderer.setSize(window.innerWidth, window.innerHeight)
document.getElementById('app').appendChild(renderer.domElement)
This creates a new WebGL renderer and sets to the render size to the browser viewport size.
The renderer creates a new <canvas> for us, it can be accessed using .domElement. We now append the new canvas to the #app element.
function resizeRenderer() {
  renderer.setSize(window.innerWidth, window.innerHeight)
  mainCamera.aspect = window.innerWidth / window.innerHeight
  mainCamera.updateProjectionMatrix()
}
window.addEventListener('resize', resizeRenderer)
The render should stay the same size as the window.
So using a simple resize event listener, we can update the render size and the camera aspect ratio.
const geometry = new THREE.BoxGeometry()
const material = new THREE.MeshPhongMaterial({ color: 0xffffff })
const cube = new THREE.Mesh(geometry, material)
mainScene.add(cube)
For this example, we will add a simple white cube to test the rendering!
function render() {
  requestAnimationFrame(render)

  cube.rotation.x += 0.01
  cube.rotation.y += 0.01

  renderer.render(mainScene, mainCamera)
}
render()
Finally, we can render the scene!
This function will handle all animation and rendering. First, it calls requestAnimationFrame, this requests the browser to call the function before a repaint.
It then rotates the cubes and renders using the main scene and camera.
Loading the 3D Model
Three.js supports loading glTF files using the GLTFLoader. If you're loading a lot of data I recommend adding extra compression with an additional loader. Such as:
- 📦 Draco - using gltf-pipeline and the Three.js DRACOLoader, an example of this can be found in the GLTFLoader documentation
The Cybertruck 3D model used in the following examples was made by PolyDucky. Licensed under CC BY 4.0
const loader = new GLTFLoader()
const modelFile = require('../model/cybertruck.glb')
First, we create a new GLTFLoader that we can use to load the model.
I am using require on the model's filename to get the bundled filename from Parcel. You will most likely want to use the URL of the file without require.
const modelContainer = new THREE.Group()
mainScene.add(modelContainer)
Next, we create a group to contain the content we are loading.
This way it's easy to modify the rotation and position from the render loop before the model loads, without needing to maintain state for loading.
loader.load(
  // resource URL
  modelFile,
  // called when the resource is loaded
  gltf => {
    modelContainer.add(gltf.scene)
  },
  // called while loading is progressing
  undefined,
  // called when loading has errors
  console.error
)
Finally, we can load the model!
Once it has finished loading, we can add it to the group we made earlier.
const clock = new THREE.Clock()

function render() {
  const delta = clock.getDelta()

  modelContainer.rotation.x += delta * 0.5
  modelContainer.rotation.y += delta * 0.5

  renderer.render(mainScene, mainCamera)

  requestAnimationFrame(render)
}
We can use a Clock to get the delta time between renders.
We use this value to increment the modelContainer rotation which makes it continuously spin. Where 0.5 is the speed modifier.
If we incremented this by a fixed value every frame without using the delta time, the rotation speed would be linked with the render speed. So a higher FPS would result in a faster rotation.
Scan Effect
This effect adds the red line that scans across the model.
Now that we have the model loaded, let's take a look at the changes required to start applying effects!
const renderTarget = new THREE.WebGLRenderTarget(
  window.innerWidth,
  window.innerHeight
)

const depthTexture = new THREE.DepthTexture()
depthTexture.type = THREE.UnsignedShortType
renderTarget.depthTexture = depthTexture
First, we create a new render target at the same resolution as our final render.
The plan is to render the 3D scene to this target instead of the screen. Then we can render the target's texture to the screen with shader effects!
We also create a depth texture and connect it with the render target. This is to access depth data from the 3D scene render to use in our effects.
const finalComposer = new EffectComposer(renderer)

const scanPass = new ShaderPass(ScanShader())
scanPass.textureID = null
scanPass.needsSwap = false
scanPass.uniforms.tDiffuse.value = renderTarget.texture
scanPass.uniforms.tDepth.value = depthTexture
scanPass.uniforms.cameraNear.value = mainCamera.near
scanPass.uniforms.cameraFar.value = mainCamera.far
finalComposer.addPass(scanPass)
Next, we create an EffectComposer. This helps us render multiple passes internally, which can finally render to the screen!
We add a ShaderPass for the scan effect to the composer, this will apply our shader to the 3D render.
textureID is set to null for this specific example. This prevents the composer from updating the input texture uniform on the shader. I do this because the composer is only being used to render a single shader pass. This means needsSwap should also be disabled to prevent the internal read/write buffers from swapping.
We provide the required uniforms to the shader:
- Diffuse texture
- Depth texture
- Camera clipping planes
Finally, the shader pass is added to the composer.
function resizeRenderer() {
  renderer.setSize(window.innerWidth, window.innerHeight)

  renderTarget.setSize(window.innerWidth, window.innerHeight)
  finalComposer.setSize(window.innerWidth, window.innerHeight)

  mainCamera.aspect = window.innerWidth / window.innerHeight
  mainCamera.updateProjectionMatrix()
}
We need to make sure the render target and effect composer sizes are updated in the resizeRenderer function!
function render() {
  const delta = clock.getDelta()

  modelContainer.rotation.x += delta * 0.5
  modelContainer.rotation.y += delta * 0.5

  scanPass.uniforms.scan.value =
    (scanPass.uniforms.scan.value + delta * 0.5) % 2

  renderer.setRenderTarget(renderTarget)
  renderer.render(mainScene, mainCamera)

  renderer.setRenderTarget(null)
  finalComposer.render()

  requestAnimationFrame(render)
}
We increment the scan float uniform using the delta value, then mod by 2. This creates a sawtooth wave between the values 0 and 2.
We set the renderer's target to the renderTarget we made earlier and render using the mainScene and mainCamera. This renders into the diffuse and depth textures used by the shader pass!
We set the renderer's target back to null which outputs to the screen, and tell the finalComposer to render. This renders the scan effect pass to the screen!
void main()
{
  vec4 color = texture2D(tDiffuse, vUv);
  float depth = readDepth(tDepth, vUv);
  float scanClamp = clamp(scan, 0.0, 1.0);
  color.r += pow(1.0 - abs(depth-scanClamp), 140.0) * (1.0 - pow(depth, 10.0));
  gl_FragColor = color;
}
Let's take a look at the fragment shader for the scan effect.
It's relatively straight forward, we retrieve a color value from the diffuse texture as a vec4 (RGBA).
Then we read the depth value into a float between 0 and 1, relative to using the camera clipping planes.
The scan value is clamped between 0 and 1 to add a simple delay between the scan effect.
The red value of the color is incremented using the depth and scan value, this creates the red scan effect on the model!
Finally, gl_FragColor is set to the modified color.
Ripple Effect
This effect adds a distorted ripple when you click on the render
const rippleCanvas = document.createElement('canvas')
rippleCanvas.width = rippleCanvas.style.width = window.innerWidth
rippleCanvas.height = rippleCanvas.style.height = window.innerHeight
const rippleContext = rippleCanvas.getContext('2d')
const rippleTexture = new THREE.Texture(rippleCanvas)
rippleTexture.minFilter = THREE.NearestFilter
rippleTexture.magFilter = THREE.NearestFilter
First, we create a <canvas> element with the same size as the 3D render. We will use the 2D context for canvas to draw circles for the ripples when you click the screen!
We create a three.js Texture for the canvas so we can provide the texture data to our effect shader.
const ripples = []

function addRipple(event) {
  ripples.push({
    age: 0,
    position: new THREE.Vector2(event.clientX, event.clientY),
    color: new THREE.Vector2(
      (event.clientX / window.innerWidth) * 255,
      (event.clientY / window.innerHeight) * 255
    ),
  })
}
window.addEventListener('click', addRipple)
When the window is clicked, we add an object to the ripples array.
This object represents a ripple to be renderered:
age- used to track how long the ripple has been rendered for, so we can grow the ripple over time and remove it once it reaches a certain age.position- pixel position of the click event, used as the center position of the ripple when rendering to the canvas.color- the color of the ripple when rendering to the canvas, used to provide the shader with the origin position of the ripple.
const RIPPLE_SPEED = 0.3
const RIPPLE_PEAK = 0.2
const linear = t => t
const easeOutQuart = t => 1 - --t * t * t * t

let rippleWasRendering = false

function renderRipples(delta) {
  if (ripples.length) {
    rippleWasRendering = true

    rippleContext.fillStyle = 'rgb(128, 128, 0)'
    rippleContext.fillRect(0, 0, rippleCanvas.width, rippleCanvas.height)

    ripples.forEach((ripple, i) => {
      ripple.age += delta * RIPPLE_SPEED

      if (ripple.age > 1) {
        ripples.splice(i, 1)
        return
      }

      const size = rippleCanvas.height * easeOutQuart(ripple.age)

      const alpha =
        ripple.age < RIPPLE_PEAK
          ? easeOutQuart(ripple.age / RIPPLE_PEAK)
          : 1 - linear((ripple.age - RIPPLE_PEAK) / (1 - RIPPLE_PEAK))

      let grd = rippleContext.createRadialGradient(
        ripple.position.x,
        ripple.position.y,
        size * 0.25,
        ripple.position.x,
        ripple.position.y,
        size
      )

      grd.addColorStop(1, `rgba(128, 128, 0, 0.5)`)
      grd.addColorStop(
        0.8,
        `rgba(${ripple.color.x}, ${ripple.color.y}, ${16 * alpha}, ${alpha})`
      )
      grd.addColorStop(0, `rgba(0, 0, 0, 0)`)

      rippleContext.beginPath()
      rippleContext.fillStyle = grd
      rippleContext.arc(
        ripple.position.x,
        ripple.position.y,
        size,
        0,
        Math.PI * 2
      )
      rippleContext.fill()
    })

    rippleTexture.needsUpdate = true
  } else if (rippleWasRendering) {
    rippleContext.fillStyle = 'rgb(128, 128, 0)'
    rippleContext.fillRect(0, 0, rippleCanvas.width, rippleCanvas.height)

    rippleWasRendering = false
    rippleTexture.needsUpdate = true
  }
}
Now there's a lot of code here, but it's logic is rather straight forward. We call this function from the render loop, and it's used for drawing the ripples to the canvas texture.
For every ripple:
- Increment the age value using delta time
- Delete the ripple if it's reached a certain age
- Draw a circle with a gradient fill and size based on age
Finally, if we rendered ripples in the previous frame but have no ripples to render in the current frame, clear the canvas to make sure there aren't any ripples left on the texture.
void main()
{
  vec3 ripple = texture2D(tRipple, vUv).rgb;
  vec2 distortOffset = normalize(vUv.xy - ripple.xy) * ripple.b + distort;
  gl_FragColor = vec4(
    ripple.b + texture2D(tDiffuse, vUv + distortOffset).r ,
    ripple.b + texture2D(tDiffuse, vUv).g,
    ripple.b + texture2D(tDiffuse, vUv - distortOffset).b,
    1.0
  );
}
In the fragment shader, we first retrieve a color from the ripple texture.
We then calculate the direction from the ripple click origin using the uv coordinates and the ripple color's xy (red green) values. This value is multipled by the blue value of the ripple color, which represents ripple intensity. This gives us an offset we can use to distort the colors.
We also add a constant value distort to the offset, so there's always a little distortion present.
Finally, we lookup the red, green and blue values from the diffuse texture. Each color is retrieved seperately because the coordinates are offset differently to add the channel shift effect. These values are now used to build a color which is set to gl_FragColor.
Volumetric Lighting
This effect adds nice rays of light around the model.
const DEFAULT_LAYER = 0
const OCCLUSION_LAYER = 1

const occlusionCamera = mainCamera.clone()
occlusionCamera.layers.set(OCCLUSION_LAYER)

modelContainer.layers.enable(OCCLUSION_LAYER)

backLight.layers.enable(OCCLUSION_LAYER)
fillLight.layers.enable(OCCLUSION_LAYER)
keyLight.layers.enable(OCCLUSION_LAYER)
We define identifiers for the layers we'll be using. Layers enable us to easily filter which objects in a scene will be rendered. By default, all objects are a member of layer 0.
We clone the mainCamera and set it's layer to OCCLUSION_LAYER. When we render using this camera it will only render objects with the occlusion layer enabled!
We also need to make sure the model container and point lights have the occlusion layer enabled.
loader.load(
  modelFile,
  gltf => {
    // Add default mesh
    modelContainer.add(gltf.scene)

    // Add black mesh set to occlusion Layer
    const occlusionScene = gltf.scene.clone()
    const blackMaterial = new THREE.MeshBasicMaterial({
      color: new THREE.Color(0x000000),
    })
    occlusionScene.traverse(node => {
      if (node.material) {
        node.material = blackMaterial
      }
      if (node.layers) {
        node.layers.set(OCCLUSION_LAYER)
      }
    })
    modelContainer.add(occlusionScene)
  },
  undefined,
  console.error
)
After adding the loaded scene to the model container, we now clone it for the occlusion render.
In the cloned scene, we update all materials to an unlit black material and set their rendering layer to OCCLUSION_LAYER.
const lightGeometry = new THREE.CylinderGeometry(3, 6, 15, 32, 6, true)
lightGeometry.applyMatrix4(
  new THREE.Matrix4().makeTranslation(
    0,
    -lightGeometry.parameters.height / 2,
    0
  )
)
lightGeometry.applyMatrix4(new THREE.Matrix4().makeRotationX(-Math.PI / 2))

const lightCylinderMaterial = new THREE.ShaderMaterial(
  VolumetricLightCylinder()
)

const lightCone = new THREE.Mesh(lightGeometry, lightCylinderMaterial)
lightCone.position.set(-5, 5, -8)
lightCone.layers.set(OCCLUSION_LAYER)
lightCylinderMaterial.uniforms.spotPosition.value = lightCone.position
mainScene.add(lightCone)
For the spotlight, we create a CylinderGeometry on the OCCLUSION_LAYER.
The cylinder is based on threex.volumetricspotlight. I modified the shader to add vertex lighting, this uses point light data to add color to the render!
function mousemove(e) {
  lightCone.position.x = 5 * ((e.clientX / window.innerWidth) * 2 - 1)
  backLight.position.x = lightCone.position.x
}
window.addEventListener('mousemove', mousemove)
To really show off this effect, we can use the mousemove event to reposition the cylinder and point light.
const occlusionRenderTarget = new THREE.WebGLRenderTarget(
  window.innerWidth * 0.5,
  window.innerHeight * 0.5
)

const occlusionComposer = new EffectComposer(renderer, occlusionRenderTarget)
occlusionComposer.renderToScreen = false
occlusionComposer.addPass(new RenderPass(mainScene, occlusionCamera))

const lightScatteringPass = new ShaderPass(VolumetricLightScattering())
lightScatteringPass.needsSwap = false
occlusionComposer.addPass(lightScatteringPass)
First, we create a render target and effect composer for the occlusion render.
We add a render pass to the effect composer. This uses the occlusionCamera to render the:
- 👤 3D Model With Black Material
- 📣 Cylinder Mesh
Then we apply a light scattering shader pass. There's a great explanation on how this shader works here: Volumetric Light Scattering in three.js
const finalComposer = new EffectComposer(renderer)
finalComposer.addPass(new RenderPass(mainScene, mainCamera))

const additivePass = new ShaderPass(AdditiveShader())
additivePass.uniforms.tAdd.value = occlusionRenderTarget.texture
additivePass.needsSwap = false
finalComposer.addPass(additivePass)
Now that we have our occlusion render, we can want to do a standard render and add them together!
We make a second effect composer, and this one will render to the screen.
First, It does a render pass using the mainCamera. Then using a simple additive shader, it adds the occlusion render texture!
const lightConeTarget = new THREE.Vector3(0, 0, -8)

function render() {
  const delta = clock.getDelta()

  modelContainer.rotation.x += delta * 0.5
  modelContainer.rotation.y += delta * 0.5

  lightCone.lookAt(lightConeTarget)
  lightCylinderMaterial.uniforms.spotPosition.value = lightCone.position
  const lightConePosition = lightCone.position.clone()
  const vector = lightConePosition.project(occlusionCamera)
  lightScatteringPass.uniforms.lightPosition.value.set(
    (vector.x + 1) / 2,
    (vector.y + 1) / 2
  )

  renderer.setRenderTarget(occlusionRenderTarget)
  occlusionComposer.render()

  renderer.setRenderTarget(null)
  finalComposer.render()

  requestAnimationFrame(render)
}
Because the light cone is moving based on mouse position, we need to make sure it's always facing towards the model and update the shader uniforms accordingly.
Finally, we render both effect composers.
Vertex Lit Particles
let frustumHeight
let frustumWidth
let frustumHeightHalf
let frustumWidthHalf

const particlesGroup = new THREE.Group()
mainScene.add(particlesGroup)

function updateFrustumValues() {
  frustumHeight =
    2.0 *
    mainCamera.position.z *
    Math.tan(mainCamera.fov * 0.5 * THREE.Math.DEG2RAD)

  frustumWidth = frustumHeight * mainCamera.aspect

  frustumHeightHalf = frustumHeight / 2
  frustumWidthHalf = frustumWidth / 2

  particlesGroup.position.x = -frustumWidthHalf
  particlesGroup.position.y = frustumHeightHalf
}
updateFrustumValues()
First, we create a group to contain the particles and add this to the mainScene.
The particles will move to the other side of the screen as they hit the viewport edge. For this we need to calculate the frustum width and height. This is the viewport size in world units at 0 Z position.
We also offset the particleContainer group to half of the frustum height, so it's positioned to the top left of the viewport at 0 Z position.
This function is executed on load, and on window resize.
const mousePositionNormalized = new THREE.Vector2(0, 0)

function mousemove(e) {
  mousePositionNormalized.set(
    e.clientX / window.innerWidth,
    e.clientY / window.innerHeight
  )
}
window.addEventListener('mousemove', mousemove)
On the window mousemove event, we update a vector to keep track of a normalized mouse position.
const PARTICLE_COUNT = 200
const PARTICLE_DEPTH = 3
const PARTICLE_SPEED = 5

const particleGeometry = new THREE.BufferGeometry()
let _particlePositions = []
let _particleSpeeds = []

for (let i = 0; i < PARTICLE_COUNT; i++) {
  let x = Math.random() * frustumWidth
  let y = -(Math.random() * frustumHeight)
  let z = (Math.random() * 2 - 1) * (PARTICLE_DEPTH / 2)
  _particlePositions.push(x, y, z)
  _particleSpeeds.push(1 + Math.random() * PARTICLE_SPEED)
}

const particleSpeeds = new Float32Array(_particleSpeeds)
const particleStartPositions = new Float32Array(_particlePositions)
const particlePositions = new THREE.Float32BufferAttribute(
  _particlePositions,
  3
)
particleGeometry.setAttribute('position', particlePositions)

const particleMaterial = new THREE.ShaderMaterial(VertexLitParticle())
particleMaterial.uniforms.pointSize.value = 2.0
const particles = new THREE.Points(particleGeometry, particleMaterial)
particlesGroup.add(particles)
First, we generate a random speed and position for every particle within the frustum and depth bounds.
Then we create buffer geometry for the particles with the positions as an attribute.
Finally, we create Points using the buffer geometry and a vertex lit shader, so the particles are colored from the point lights!
function animateParticles(delta) {
  let i = 0
  for (let p = 0; p < PARTICLE_COUNT; p++) {
    particlePositions.array[i] =
      (particleStartPositions[i] * frustumWidthHalf +
        particleSpeeds[p] * (1.0 + mousePositionNormalized.x * 4.0) * 0.2) %
      frustumWidth

    particlePositions.array[i + 1] =
      (particleStartPositions[i + 1] * frustumHeightHalf +
        particleSpeeds[p] * (1.0 - mousePositionNormalized.y * 4.0) * 0.1) %
      frustumHeight

    i += 3
  }

  particlePositions.needsUpdate = true
}
Now from the render loop, we update the X and Y positions of all particles based on the mouse position, particle speed, delta time and frustum bounds!
ASCII Effect
const fontLoader = new THREE.TextureLoader()
const fontFile = require('../font.png')
const tFont = fontLoader.load(fontFile)
tFont.minFilter = THREE.NearestFilter
tFont.magFilter = THREE.NearestFilter
First, we load the bitmap font texture.
This contains the text characters that we will use to render the effect!
const FONT_CHAR_SIZE = new THREE.Vector2(8, 8)

function getLowResSize() {
  const charCountPrecise = [
    window.innerWidth / FONT_CHAR_SIZE.x,
    window.innerHeight / FONT_CHAR_SIZE.y,
  ]

  const charCountCeil = charCountPrecise.map(Math.ceil)

  return {
    charCountPrecise,
    charCountCeil,
  }
}

const startingSizeData = getLowResSize()
const lowResRenderTarget = new THREE.WebGLRenderTarget(
  startingSizeData.charCountCeil[0] * 2,
  startingSizeData.charCountCeil[1] * 2
)

const lowResDepthTexture = new THREE.DepthTexture()
lowResDepthTexture.type = THREE.UnsignedShortType
lowResRenderTarget.depthTexture = lowResDepthTexture
We create a render target and depth texture which has 1px for every text character that can fit onto the screen.
We will render the 3D scene to this and use it as the input to the ASCII shader effect!
const finalComposer = new EffectComposer(renderer)

const asciiPass = new ShaderPass(ASCIIShader())
asciiPass.uniforms.tLowRes.value = lowResRenderTarget.texture
asciiPass.uniforms.tDepth.value = lowResDepthTexture
asciiPass.uniforms.cameraNear.value = mainCamera.near
asciiPass.uniforms.cameraFar.value = mainCamera.far
asciiPass.uniforms.tFont.value = tFont

finalComposer.addPass(asciiPass)
We use an effect composer to render the ASCII effect to the screen.
We create a shader pass for the ASCII effect and provide the basic uniforms:
- Diffuse texture from the low resolution 3D scene render
- Depth texture from the low resolution 3D scene render
- Camera clipping planes
- Font texture
const fontCountX = FONT_MAP_SIZE.x / FONT_CHAR_SIZE.x
const fontCountY = FONT_MAP_SIZE.y / FONT_CHAR_SIZE.y

asciiPass.uniforms.fontCharTotalCount.value =
  Math.floor(fontCountX) * Math.floor(fontCountY)

asciiPass.uniforms.fontCharSize.value.set(1 / fontCountX, 1 / fontCountY)

asciiPass.uniforms.fontCharCount.value.set(fontCountX, fontCountY)

function updateAsciiRenderSize() {
  const size = getLowResSize()

  asciiPass.uniforms.renderCharSize.value.set(
    1 / size.charCountPrecise[0],
    1 / size.charCountPrecise[1]
  )

  asciiPass.uniforms.renderCharCount.value.set(
    size.charCountPrecise[0],
    size.charCountPrecise[1]
  )

  lowResRenderTarget.setSize(
    size.charCountCeil[0] * 2,
    size.charCountCeil[1] * 2
  )
}

updateAsciiRenderSize()
This code is used to pre-calculate values used by the shader for better performance.
fontCharTotalCount- total count of characters in the font texturefontCharSize- normalized size of character relative to font texturefontCharCount- horizontal and vertical count of characters in the font texturerenderCharSize- normalized size of character relative to render sizerenderCharCount- horizontal and vertical count of characters in the render
void main()
{
  vec2 roundedUv = vec2(
    floor(vUv.x * renderCharCount.x),
    floor(vUv.y * renderCharCount.y)
  ) * renderCharSize;

  float depth = readDepth(tDepth, roundedUv);
  vec4 color = texture2D(tLowRes, roundedUv);

  float charIndex = depth * fontCharTotalCount;

  vec2 fontuv = vec2(
    mod(vUv.x, renderCharSize.x),
    mod(vUv.y, renderCharSize.y)
  ) * renderCharCount * fontCharSize + vec2(
    floor(mod(charIndex, fontCharCount.x)) * fontCharSize.x,
    floor(charIndex * fontCharSize.x) * fontCharSize.y
  );

  gl_FragColor = texture2D(tFont, fontuv) * color;
}
We can now take all that data and render the ASCII effect!
We calculate a roundedUv which snaps the uv to the same result for every text character on the screen. We use these coordinates to read the depth texture and lookup the diffuse color!
We use the depth value to pick a character to render from the font texture (charIndex). And calculate the coordinates to use with the font texture.
Finally, we lookup the color from the font text and multiply it by the diffuse color from the low resolution 3D scene render!
Final Result
Conclusion
I hope this post inspires you to experiment with shaders for web design!
A whole bunch of code and writing went into making this blog post. If I've missed something or If you have any questions please let me know on Twitter or stop by my Twitch live stream where I'm often coding and answering questions!